

Description:
The soil moisture sensor is used to measure the amount of moisture in the soil. The moisture content of the soil may be used to calculate the amount of water in it. The sensor uses capacitive sensing rather than resistive sensing, like other types of moisture sensors, to sense soil moisture levels. Because it is composed of a corrosion-resistant substance, it can prevent corrosion and has a long service life. The device also contains an onboard voltage regulator, allowing it to operate between 3.3 and 5.5 volts. It works with low-voltage MCUs (both 3.3V and 5V logic). An ADC converter is required to make it compatible with a Raspberry Pi.
Package Includes:
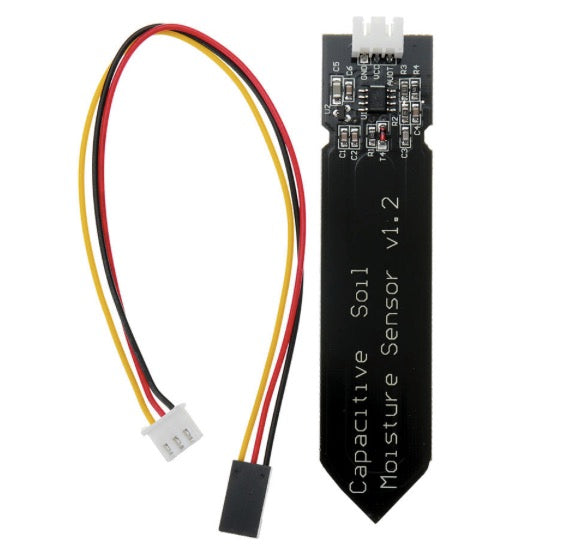
- 1 x Capacitive Soil Moisture Sensor
- 1 x Connection Cable
Features:
-
This analog capacitive soil moisture sensor measures soil moisture levels by capacitive sensing.
-
rather than resistive sensing like other types of moisture sensor
-
It is made of a corrosion-resistant material, giving it a long service life
-
Insert it into the soil and impress your friends with the real-time soil moisture data
-
This module includes an on-board voltage regulator, which gives it an operating voltage range of 3.3 ~ 5.5V
Capacitive Soil Moisture Sensor Pinout
The capacitive soil moisture sensor features a 3-pin JST PH2.0-type connector. One end of the provided cable plugs into this connector, while the other end is a standard Dupont-style 3-pin female connector. The cable is color-coded so you can easily identify which wire is which: black represents ground, red represents VCC, and yellow represents AOUT.

VCC is the power supply pin. It is recommended that the sensor be powered from 3.3V to 5V. Please keep in mind that the analog output will vary depending on the voltage supplied to the sensor.
GND is the ground pin.
The AOUT pin gives an analog voltage output that is proportional to the amount of moisture in the soil. The output can be read using an analog input on your microcontroller. As the moisture level increases, the output voltage decreases, and vice versa.
Wiring a Capacitive Soil Moisture Sensor to an Arduino
Connecting a capacitive soil moisture sensor to an Arduino is a breeze. You only need to connect three wires.
Start by connecting the sensor’s red wire (VCC) to the power supply; 3.3V–5V is fine. Use the same voltage that your microcontroller logic is based on. For most Arduinos, that is 5V. For 3.3V logic devices, use 3.3V. Now connect the black wire (GND) to ground.
Finally, connect the yellow wire (AOUT) to one of the analog input pins on your Arduino. In our case, it is connected to the A0 pin.
The following table lists the pin connections:
| Soil Moisture Sensor | Arduino | |
| VCC | 5V | |
| GND | GND | |
| AOUT | A0 |
The wiring is shown in the image below.

Finding the Threshold Values
It is not possible to determine the actual percentage of moisture in the soil directly from the measurements taken. However, it is relatively easy to define basic ranges for what is considered “too dry,” “too wet,” and “just right.”
Simply run the sketch below and record your sensor output under three basic conditions:
- When the soil is dry enough that the plant needs watering.
- When the soil has been watered to its ideal moisture level for the plant.
- When the soil has been heavily watered and is too wet, which is not ideal for the plant.
  // Define analog input
#define sensorPin A0

void setup() {
  // Setup Serial Monitor
  Serial.begin(9600);
}

void loop() {
  // Read the Analog Input
  int value = analogRead(sensorPin);

  // Print the value to the serial monitor
  Serial.print("Analog output: ");
  Serial.println(value);

  // Wait for 1 second before the next reading
  delay(1000);
}
Upon running the sketch, you should expect readings similar to the ones listed below:
- In open air: approximately 590
- Dry soil that needs watering: approximately 380
- Ideal soil moisture: between 277 and 380
- Soil that has just been watered: approximately 277
- In cup of water: approximately 273
This test may require some trial and error. Once you have the readings, you can use them as a threshold to trigger an action.
Arduino Example Code
The sketch below estimates the level of soil moisture using the following threshold values:
- < 277 is too wet
- 277 – 380 is the target range
- > 380 is too dry
/* Change these values based on your observations */
#define wetSoil 277   // Define max value we consider soil 'wet'
#define drySoil 380   // Define min value we consider soil 'dry'

// Define analog input
#define sensorPin A0

void setup() {
  Serial.begin(9600);
}

void loop() {
  // Read the Analog Input and print it
  int moisture = analogRead(sensorPin);
  Serial.print("Analog output: ");
  Serial.println(moisture);

  // Determine status of our soil
  if (moisture < wetSoil) {
    Serial.println("Status: Soil is too wet");
  } else if (moisture >= wetSoil && moisture < drySoil) {
    Serial.println("Status: Soil moisture is perfect");
  } else {
    Serial.println("Status: Soil is too dry - time to water!");
  }
  Serial.println();

  // Take a reading every second
  delay(1000);
}
If everything is fine, you should see similar output on the serial monitor.
